This time I'll discuss the kind of image processing involved in the tri-band Solar images previously shown here on this blog.
 |
| Frame selection, alignment and stacking (AviStack) |
After data aqcuisition you'll have three data sets; one for zero detuning, medium detuning and maximum detuning of the filter. Before these are combined into a tri-band composite the image processing is the same as you would normally do. If you made a movie you’ll select, align and stack the sharpest images with software such as AviStack or Registax. You might also perform flat field correction. Finally, the images may be sharpened and perhaps also corrected for solar limb darkening. You can choose whatever you want to do – the only important issue is that you do the
same for all images prior to making the tri-band composite, or else strange color artifacts may appear in the final image. I won't go into further detail here about these steps because they are not particular to tri-band imaging.
 |
| Wavelet sharpening (Registax) |
 |
| Background flattening (MaxIm) |
On close-up images, like the one in the example above, I often 'flatten the background' - i.e. adjust the brightness of non-active regions to a uniform brightness level. This deals with any uncorrected vignetting and removes solar limb darkening effects. Background flattening ensures that the maximum dynamic range is used for displaying details of the chromosphere and active regions therein.
I use Photoshop for the remaining process steps where the tri-band image is created. First, all three images are opened and then merged as red, green, blue channels in a color image. Be sure to maintain the bit depths of the original images - I typically work with 16 bits. You can assign the images in whatever way you prefer; I have mostly chosen to use the most detuned image for the red channel, the medium detuned as green and the H-alpha channel as blue. This makes 'energetic' features blue/green or white and more quiescent regions red/yellow. There is nothing 'correct' in this, just do whatever you prefer!
 |
| Alignment of RGB levels. |
Next, use the move tool to align the RGB channels to each other, while using some distinct feature such as a sunspot for reference. You don't have to do this perfectly, it's always possible to tweak the alignment later on.
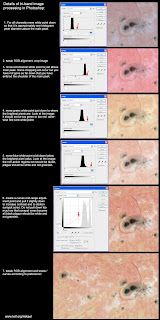 |
Levels/curves details
(click for large version) |
The following steps consist of several levels/curve adjustments with the purpose of increasing brightness/contrast and achieving a suitable color balance. All of these steps are really subjective - click the image at right to see details of the method a have chosen to follow for many of my images.
To illustrate that the results can be very different according to taste, look at the image below and see what happens if the hue is adjusted differently!
That's really all there is to it. If you are skilled doing regular narrowband Solar imaging the extra steps involved in tri-band imaging should be no big deal. However, there are limitations and challenges - in the next part of this blog I'll discuss some of these!
 |
| The colors of a tri-band image are as much subject to personal taste as regular narrowband images. Above, I made a major hue adjustment to achieve a completely different look! (click for large version) |


No comments:
Post a Comment