Tuesday, August 8, 2017

Grand rehearsal

Time for the grand rehearsal - doing everything I'm planning to do on eclipse day; outside in the real world. This is essential for success. I should be doing this many times, but - as usual - I am late and there's only time for one test.

Setting up went fine - I've done it many times already. Rotated the camera so that the diurnal motion aligned with the long axis of the sensor. This takes roughly half an hour, but there should be plenty of time during the partial phase for this.
Setting up for the grand rehearsal. If only the clouds would go away...

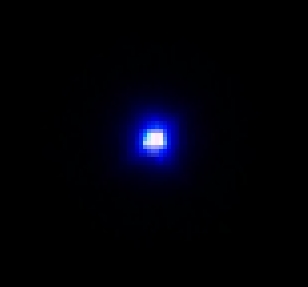
I struggled to focus on the sun using the white light filter and focusing mask. The extreme contrast of the scene (blank, white sun surrounded by blackness) confuses some automatic contrast adjustments to the liveview display - especially when I zoom in on the solar edge. This kind of focusing works beautifully on the moon and on stars. I don't know how to solve this! Maybe the eclipsed sun will work better. Maybe I'll just have to dump liveview and use actual images. I wonder how others do this?? Frustrating....

While fumbling with liveview I discovered that doing so eats up the battery extremely fast! Around 10-15 minutes of liveview is all it takes to fully deplete the battery. For all other camera operations the battery efficiency is really good, so this caught me by surprise. Not nice to discover on eclipse day. I have ordered two spare batteries since I only had one. Phwew....

The time to execute all 770 planned images is roughly one hour and I didn't experience any other battery problems. Switching memory cards went fine.

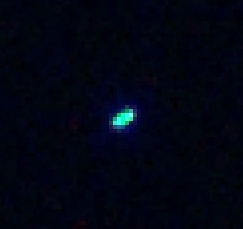
I tested placing the solar edge at the left edge of the field of view (FOV) at precisely 6 minutes prior to mid-eclipse. I have previously calculated that this should result in perfect framing during mid-eclipse. The image below is a combination of the first and last shot of my eclipse sequence. The centering is very good and diurnal drift is well contained within the FOV. Should work fine on eclipse day - I'll use Eclipse Orchestrator to calculate the precise time once we have arrived on location.
First and last shot from the totality imaging script combined. Framing is perfect! 

Apropos location: I tested using my smartphone to get the GPS coordinates. Worked fine using Google maps (touch and hold the blue 'here' indicator, see a red pin appear with the GPS coordinates displayed in the search box at the top). Now I just need to get a GPS certified time signal - haven't figured that out yet.


Sunday, August 6, 2017

Callibration frames

High resolution imaging of the corona has been pushed to stunning new heights by Miloslav Druckmüller and colleagues. An important feature of their work is more rigorous image processing than what is normally used. Doing this properly results in less image noise which in turn enables more aggressive image processing to bring out subtle details. Still, Miloslavs images do not look overly processed - they just look like the real thing as you can see visually unaided or with a small binocular.

To achieve low noise images it is vital to do proper image callibration; i.e. bias, dark and flat field correction. I do combined bias and dark correction by taking 40 images at each setting used during totality with the lens hood on and the setup covered by black cloth. These are taken just after totality has ended. I use 13 different settings during totality, so this amounts to 13x40=520 images! Afterwards the solar filter and lens hood is replaced by a white cloth, fastened with a rubber band. Using ISO 100 and whatever exposure time gives a signal around 1/3 of full well capacity (typically around 1/1000 sec) I then do 210 flat field images. Finally, 40 more bias+dark frames are taken at the same setting.

This is really boring work and it is done during the remaining partial phase of the eclipse. My DSLR card capacity is 8GB - equal to 296 full resolution raw images. I will be taking 77 images of totality, followed by 770 callibration images! I have two memory cards, so when one is full I'll switch card and start transferring images to my computer using a card reader. In this way the camera will be working non-stop and all images acquired in as short a time span as possible. This is important since the camera noise can vary with time and ambient temperature.

An overview of my complete imaging plan is shown below. I'll be running five Eclipse Orchestrator scripts over the course of one hour - resulting in 847 images. All just to get one - hopefully great - image of the eclipsed Sun!

Overview of my imaging plan, along with details of exposure settings and what to do when.
A typical flat field image. The response variations are ~5% of the total signal.

Wednesday, August 2, 2017

Filtering and masking

A solar filter is required for scope aiming, focusing and DSLR orientation prior to the eclipse. This filter is only removed during totality or else the camera will be fried. It must be fast and easy to remove without applying much force to the setup. The perfect solution for this is the solar safety film from Baader Planetarium. This is high quality, cheap and easy to build into a filter cell of your own making. My daughter and I had a fun rainy afternoon doing this using just some carton, gaffer tape and a circular cutting tool.
Building our Solar filter using Baader film.
Another important tool is the focusing mask. The solar disc does not offer much focusing help - you basically are left with gauging the fuzziness of the sharp horns of the eclipsed Sun. By using a simple mask with two opposing holes at the edge of the main objective two distinct images of the Sun will result. Even when slightly out-of-focus these two images will not overlap. Only at precise focus do they merge into one image, see an example below using the moon. Such a mask is a great tool for achieving tack-sharp focus on eclipse day. The last focusing tweak should be done 10-15 minutes before totality, thereby minimizing the risk of focus drift.

Solar filter and focusing mask.

Focussing on the moon using the mask. When out of focus two distinct images
are formed. Only at perfect focus do the merge into one.

Orientation and aiming

The DSLR camera can easily be rotated to any angle. The Sun is round, so you'd think that just getting the Sun properly centered would be enough. Wrong! The corona during solar minimum (which we are approaching) is elongated along the ecliptic.
Corona at solar minimum (left) and maximum (right).
Ecliptic is oriented along horizontal axis.
The Sun's motion in the sky due to Earths rotation (diurnal motion) is tilted relative to the ecliptic by the tilt of the Earths rotation axis. At the time of eclipse this angle is 20 degrees. For fixed mounts you want the long axis of the image roughly aligned with this motion so that there's as much image space as possible to contain the Sun's motion during the eclipse. It turns out that during this particular eclipse there is yet another reason for orienting the camera like this - and that reason is named Regulus!

Regulus is a bright (mag. 1.4) star, which - by fortunate cosmic coincidence - will be situated just 1.3 degrees from the Sun during totality. That can make for a nice visual: having a distant star embedded in the outer reaches of the corona. (It also helps a lot during image processing). I don't know if Regulus will be visible (and how much so) in my setup, but I'd like to give it a try. Below is shown the field-of-view (FOV) with my setup. The long axis of the image is aligned with the diurnal motion. The corona will be nicely framed, with the long equatorial extensions reaching out along the ecliptic. Regulus will also be well positioned.
Simulated field of view with my setup (Nikon D300, f=400mm). The bright star to the left is Regulus.
The time it takes for the Sun to move from the left-most edge to the center of my FOV is 6 minutes and 3 seconds, see the illustration below. I can get perfect framing during mid-eclipse by placing the edge of the crescent Sun precisely at the left edge of the DSLR viewfinder at the correct time. With totality lasting just over two minutes this time is five minutes before it starts. After arriving at the final location, I'll just have to calculate the precise time of second contact, then do this final telescope aiming 5 minutes before that time. This will be the final adjustment required and then I can ignore the imaging setup completely - confident of perfect framing and being able to enjoy the eclipse with my own senses!
Placing the crescent Sun at the left edge of the FOV precisely 5 minutes before
totality starts will result in perfect framing at mid-eclipse. 

Thursday, July 27, 2017

Checking collimation and killing fringes

After many cloudy days and nights I finally had the chance to test two things:
  1. does collimation of the F/4 refractor hold up against time and handling?
  2. how much can the blue fringes of my ED optics be improved by filtering?
Ten days ago I succesfully collimated the optics of my refractor - operating at F/4 is quite unforgiving in terms of alignment. However, it is not enough just to be able to collimate the scope and take images. I must be able to collimate the scope the evening before the eclipse, transport it for many hours in a bus over bumpy roads - and then get sharp images after setting up in the field. It has now been 10 days since the first collimation and I've transported the scope a couple hundred kilometers by car and handled the scope quite a bit.

Testing the scope on the artificial star showed that collimation had remained good! I did not even tweak it before continuing. Next, I aimed at Vega, focused using liveview in Imagesplus and ran the Eclipse Orchestrator script that will be used during the eclipse. This gave lots of shots, from which three closeup images at three different exposure times are shown below. The stellar FWHM is around 2-2.3 pixels - a bit more than last time but that could be due to different seeing conditions. The image scale is 2.86 "/pixel, so my angular resolution is around 6".
Closeup views of Vega at three different exposure times.
The new 'fringe killer' filter was installed for the images above, but to really see the effect I have compared saturated images of Vega (1/2.5 sec, ISO 200) to identical exposures taken an earlier night without the filter. As seen below, the filter clearly reduces the intensity of the blue halo. I'd say that anything the size, price and convenience of this filter, that will help improve coronal contrast, is very welcome in my setup!
Saturated exposures of Vega showing how the Fringe Killer filter helps reduce the intensity of the blue halo.
A more quantitative analysis of the filter performance is shown below. The graphs were made by averaging all lines of the images above. The red/green channels are unaffected by the filter, while the blue channel is reduced by ~35%. Definitely worth the effort!
Line averages from the Vega images above. Red, green, blue lines correspond to each color channel of the image; dotted lines are without the filter while full line is with filter.

Monday, July 24, 2017

Getting aligned...

During my last session I found that the Borg F/4 refractor was poorly collimated - not really very surprising since I hadn't done any adjustments after assembling the scope parts. In the past, I have not been able to satisfactorily collimate the optics of this scope - there just wasn't enough travel in the main objective adjustment screws. So, I was a bit worried whether I could do it this time. If not, then I'd have to ditch this configuration and go with the main objective at F/6.4 without field reducing optics.

Last evening I set up for collimation using an 'artificial star' on a tripod 70 meters away. With a 13mm eyepiece and a 5x Televue Powermate it was easy to see the in-focus diffraction rings - they were indeed way off as the previous test session had suggested. This time I had no problems getting good collimation; although it was at the extreme end of the refractor's possible adjustment range.

Right after doing this I attached the DSLR and aimed the scope at Vega, focusing in liveview with Imagesplus like before. Then I ran the Eclipse Orchestrator script, running through various exposure settings. The image below shows three identical shots before and after collimation (exposure time 1/320 sec, ISO 100). The improvement is dramatic: FWHM has decreased from 4.3 to 1.8 pixels - great!!!! The next question is: how stable is the collimation? I need the scope to be able to take some handling and still retain excellent collimation, since it won't be possible to fiddle with that on eclipse day. I'll do some scope handling and then repeat this test a week later to see if collimation holds.

Close-up images of Vega before and after collimation of the Borg F/4 scope.
A longer exposure is shown below - the blue halo seen last time is still very apparent. This reveals a limitation of my optics: they are not true apochromatic; 'only' extra dispersion (ED) corrected. This will reduce contrast of fine coronal details and produce a blue ring where the black moon meets the bright inner-corona. However, the problem can be alleviated with the 'Fringe Killer' filter which reduces the blue/violet component of the spectrum. I ordered the 2" version which will fit inside my existing adapter, roughly 2" in front of the DSLR sensor. Can't wait to test this out!
Longer exposure reveals a blue/violet halo, as expected from ED optics. I want to avoid this on eclipse day!
A final thing I learned this evening was just how long I can expose without experiencing image smear due to diurnal motion. The image below is a one second exposure; it is fairly clear that half a second will have no image smearing.
Smearing of stellar image during 1 sec exposure due to diurnal motion.

Friday, July 14, 2017

Putting the pieces together....

The new tripod and alt-az mount has arrived and look very nice - great workmanship and finish. The compactness of the tripod and dual-scope capacity of the mount will do wonders in reducing the amount of gear I need to haul along. I am using a simple aluminium plate to connect the Borg refractor to the mount - it needs to be offset pretty far from the mount to ensure proper balancing.
Berlebach tripod and TS AZ5 mount with the two refractors that I'll be using for the upcoming total solar eclipse.

Next step is to connect all the parts and do some field testing of the imaging setup. I need to find out if the setup suffers from vibrations and investigate if the optical quality of the 4" f/4 refractor is OK. Doing this is really simple: just set up like it's a total solar eclipse, point the scope at Vega and run the Eclipse Orchestrator script. This script runs through a number of exposures, ranging from 1/800 to 1.3 second. The short exposures will primarily sample the optical quality while the longer ones will be sensitive to vibrations.
In-focus stellar images taken with Borg 4", f/4 refractor. Scope was not collimated prior to this test.
I focussed the scope using a zoomed liveview display on my laptop. A bright blue halo appeared around Vega at focus and the highly out-of-focus image was not perfectly round. This is not indicative a excellent optical performance! I was in a hurry, so I pressed on running the script. Below are shown six images from the run; three at 1/320 second exposure and three with 1.3 seconds. Each series shows the same star which is near the center of the field. From these shots I conclude:
  1. The short exposures are generally sharper and more variable - both effects are due to atmospheric seeing.
  2. The short exposures reveal an asymmetrical halo - this is likely due to optical misalignment within the scope.
  3. The long exposures show no signs of vibration
The refractor used for this test consists of a Borg 4" f/6.4 ED lens coupled with field corrector and reducer lenses to yield f/4. Such a fast configuration does require careful attention to mechanical alignment of the optical elements - and I did none prior to this test. I have previously done tests at f/6.4 where I could reach FWHM=3.2 pixels.

Next step is to try and improve the collimation of the f/4 configuration - if I can't get it satisfactory I'll go for f/6.4 and the sharper images. Perhaps it would also be beneficial to use a filter to reduce the blue wavelengths - this is known to improve contrast with achromatic and ED refractors.

Saturday, May 20, 2017

Over the years I've hauled many different setups to solar eclipses - and this year is no exception. Each time I have some different ambition, requirement or constraint.

To photograph totality I want to use a 15 year old Borg 100ED F/4 refractor. This instrument isn't too heavy and is fairly compact. The camera will be a Nikon D300 - not state of the art, but this is what I have. I do have lightweight and heavy-duty tripods and mounts which I've used before. However, these are either too little or too much - resulting in either non-optimal images or very heavy luggage. So, this time I'll be optimizing the setup by buying a new tripod and telescope mount - here's what I just ordered yesterday from a German shop:

The Berlebach Tripod UNI 8 is a transportable tripod for astronomical mounts - best quality "made in Germany". The low height makes it ideal for Newtonian telescopes, 323 euro.

  • Weight 6 kg - 13.2 lb.
  • Minimum height 60 cm - 24 inch
  • Maximum height 83 cm - 33 inch
  • Transportation length 67 cm - 26 inch
  • Load capacity 60 kg (121 lb) with very good vibration damping
  • Stable accessory tray (37 cm)

The leg lock offers an even spread and prevents the legs from slipping, 58 euro.

  • Suitable accessory tray included
  • The legs are locked in a defined angle of 23°
  • The spread stopper comes readily installed with the UNI tripod

Berlebach tripod bag 24cm / 70cm length, 42 euro

TS AZ5 Alt-azimuthal Mount with fine adjustment in both axes. A very stable alt-azimuthal mount. Accommodates two different instruments in parallel. Features:
  • maximum load 13 kg, at full stability
  • fine adjustment with clamping in both axes
  • telescope mounting with robust quick coupling with area clamping
  • further attaching with 90° offset for binoculars or spotting scopes - up to 5 kg can be kept in balance
  • counterweight shaft included in delivery, can be attached in two positions
  • with versatile tripod connection
Berlebach Tripod Adapter from UNI to Vixen GP, Skywatcher EQ5 and similar. This adapter is necessary for using Vixen GP and SkyWatcher EQ5 mounts with the Berlebach UNI tripods.


For viewing the partial phases I have a 70mm refractor with a H-alpha filter - this can go on the same mount as the photography equipment since the mount can accept two scopes. Thereby I only have to bring a single tripod and mount instead of two!

Friday, May 19, 2017

I'm baaack.....

Hi world,

it has been three years since the blog was last updated. About time to get back to it! Since last time I have been on three eclipse expeditions to Ethiopia, Indonesia and Madagascar. Check out this movie we made from totality in Indonesia!

Ingrid and the corona - Indonesia 2016
Now I am warming up to the next total solar eclipse which will occur in the U.S.A. on August 21st, 2017. I am leading a group from Viktors Farmor to Oregon. In addition to providing a great experience for the guests I'll also attempt to photograph the eclipse using a 4-inch refractor and a DSLR camera. I have done almost all kinds of astrophotography over the years and a total solar eclipse is - by far - the hardest project to undertake. I have failed three times and succeeded once. Even with the one where I finally got the images the post-processing of these to yield a final result has proven so daunting that I haven't yet done it!

Still, I'm trying again. Follow this blog in the coming months to see how it goes.